I've been working on some Moog panels during the last week. This is the first panel I've done with the CNC router, rather than using templates and a traditional router table. The originals were measured and modeled up in Sketchup. This 3d model was exported to a CAM package for creating the toolpath G-Code for the CNC machine. This G-Code was then loaded into the machine control software to produce the cuts.
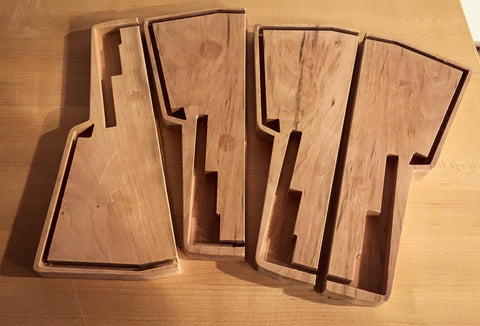
The MG-1 / Rogue panels have some intricate inner grooves that hold the front panel and 1/4" of epoxy (not the best design in the world!) Anyway, I've done similar ones like these by hand before for a Taurus II and it's very tricky to get perfect. The CNC made this so much more accurate. It took 4 tries to get the model perfect, but the finally, the fit was amazing.
The extra recesses you see in the front are for the keyboard "book ends"; these will function as a mortise and tenon style joint for extra stability. I hope to finish these in the next few days and have the products available for order.
The panels shown are done in American Black Cherry...a woodworkers dream wood. I'll finish them with a natural oiled look, and a hand rubbed semi-gloss finish. Overtime, this wood will darken and take on deeper reddish hues.
Oh, and those round spots on the wood in the photo? Those are hot glue residue I've yet to remove. This is from a finishing step I'll discuss in another post...but essentially it involves attaching a pair of panels together and sanding as one piece...a trick that insures you get exactly matching profiles.